Amaryllis: Four Week Update

7255

A month ago, on January 12th, I began the process of bringing my amaryllis bulbs out of their dormancy by taking them out of basement storage, pulling off the dead leaves, watering them well, and putting them in a warm room, in front of a sunny window – expecting to see flowers in six to eight weeks.

A month later, they have put on about six inches of growth – no flower buds are visible yet and the oddly, the biggest bulb in the largest pot has failed to put on any growth … yet.   The smallest bulbs pushed up growth in about a week, the rest took an additional week, on the third week, the pots were watered again and will be watered approximately once a week from now until the month of September, when water will be withheld so that they will go back into dormancy.

7232

A month ago the potted bulbs were brought up from my basement pump room, a cool room where I store summer bulbs such as canna, potatoes, and tender geraniums.  You can refresh your memory of the process here.

7078

The amaryllis bulbs in winter storage – a cool dry area, above freezing temps.


Share Button

Senior Living Goes Native!

2215

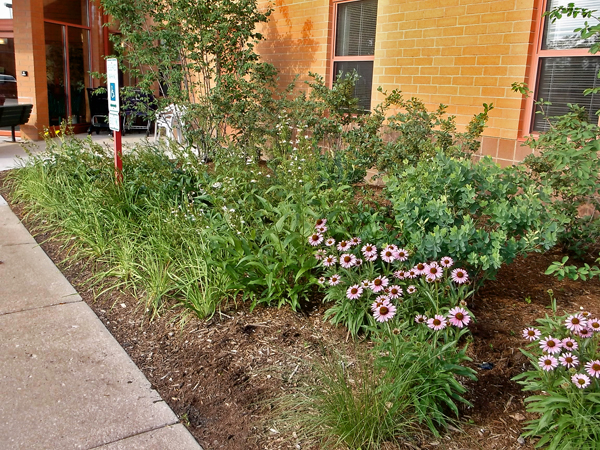
‘Pixie Meadowbrite’ Purple Coneflower complements the purple blooms of Leadplant in front, with yellow Paradox Coneflower to the rear of the photo.

Often (always), when I’m in my car, I check out the landscapes surrounding homes, carwashes, hospitals, banks, etc. – mostly it is the standard hedges of Japanese Yew, with some daylillies, a crabapple or two, Pfitzer and Hetz Junipers growing out of their planetary and spiral sheared shapes, even an occasional Yucca to remind us of their tenacity, since no one has used them in a planting design since the 1970’s.  Oh, and big useless swathes of lawn – lots of lawn.  Americans love their lawns.  These plantings mostly reflect our post-war (World War II, that is) fascination with the  formal gardens of Europe – of course, we called them “modern landscapes,” rather than European inspired landscapes, because, heck, we’re Americans, and we don’t copy, we lead.

Palos Park 1957

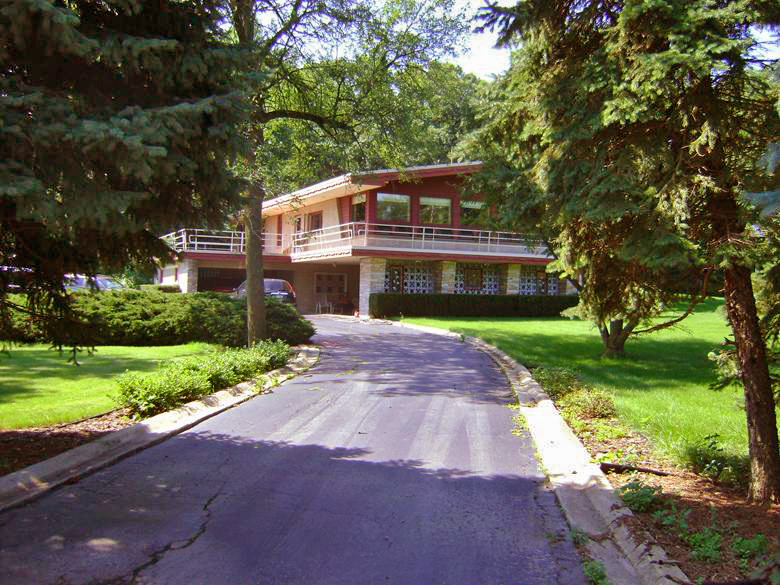
This Mid-Century house has it all, large lawn, evergreen trees, sheared foundation yews, Pfitzer Junipers, even a row of hosta along the driveway. This was the standard landscape installation for too long.

In 1956, Garrett Eckbo, a landscape architect, and World War II veteran, wrote in his book The Art of Home Landscaping:  

“In the Southwest, where native vegetation tends towards dull grays and browns, the strong dark or clear greens of plants from more humid areas (grown with irrigation) are a welcome relief and contrast, and definitely render the climate more livable.  In grasslands and prairies we plant trees; in forests we clear open spaces and plant grass; in the desert we introduce both trees and grass.  All of these changes have the  function of equalizing, improving, and humanizing these landscapes, making them better places for us to live.” 

In another part of the book Eckbo does encourage lawn only where it is necessary, and to choose trees and shrubs that will not outgrow their location so that their need for pruning is minimized.  If only that happened in the real world.  In the real world, we have three story tall Norway Spruce trees terrorizing all other plant life and blocking the winter sun, lawns in arid Las Vegas, escaped English Ivy taking over our East Coast forests, and Limestone rip-rap surrounding our ponds and walls of metal pilings around our lakes – all in the name of making our surroundings better – more “humanized”.  Great. 

Fortunately, I have noticed changes in the last few years in just how “improving our landscapes” is defined.  In 2000, while working at OWP&P Architects in Chicago, I found myself designing a planting bed for the Skokie, Illinois Public Library, wanting to include the low prairie shrub New Jersey Tea, Ceanothus americana,  I called a large wholesale grower, Midwest Groundcovers, to ask if they had it available; they weren’t familiar with the shrub.  Fast forward, 10 or 12 years, and they not only carry New Jersey Tea, they have an entire section of their catalog dedicated to ornamental Midwestern natives and actively promote their use.  Great! 

In 2011, I was asked to redesign the front landscape of a senior living facility in Des Plains, Illinois.   The client wanted something that looked good the year around, and specifically requested that Midwestern native plants be included in the planting scheme.  All of the new plants, with the exception of Virginia Sweetspire, are Midwestern natives, some, such as the ‘Pixie Meadowbrite’ Purple Coneflower and ‘Autumn Blaze’ Maple are hydrids of native crosses. 

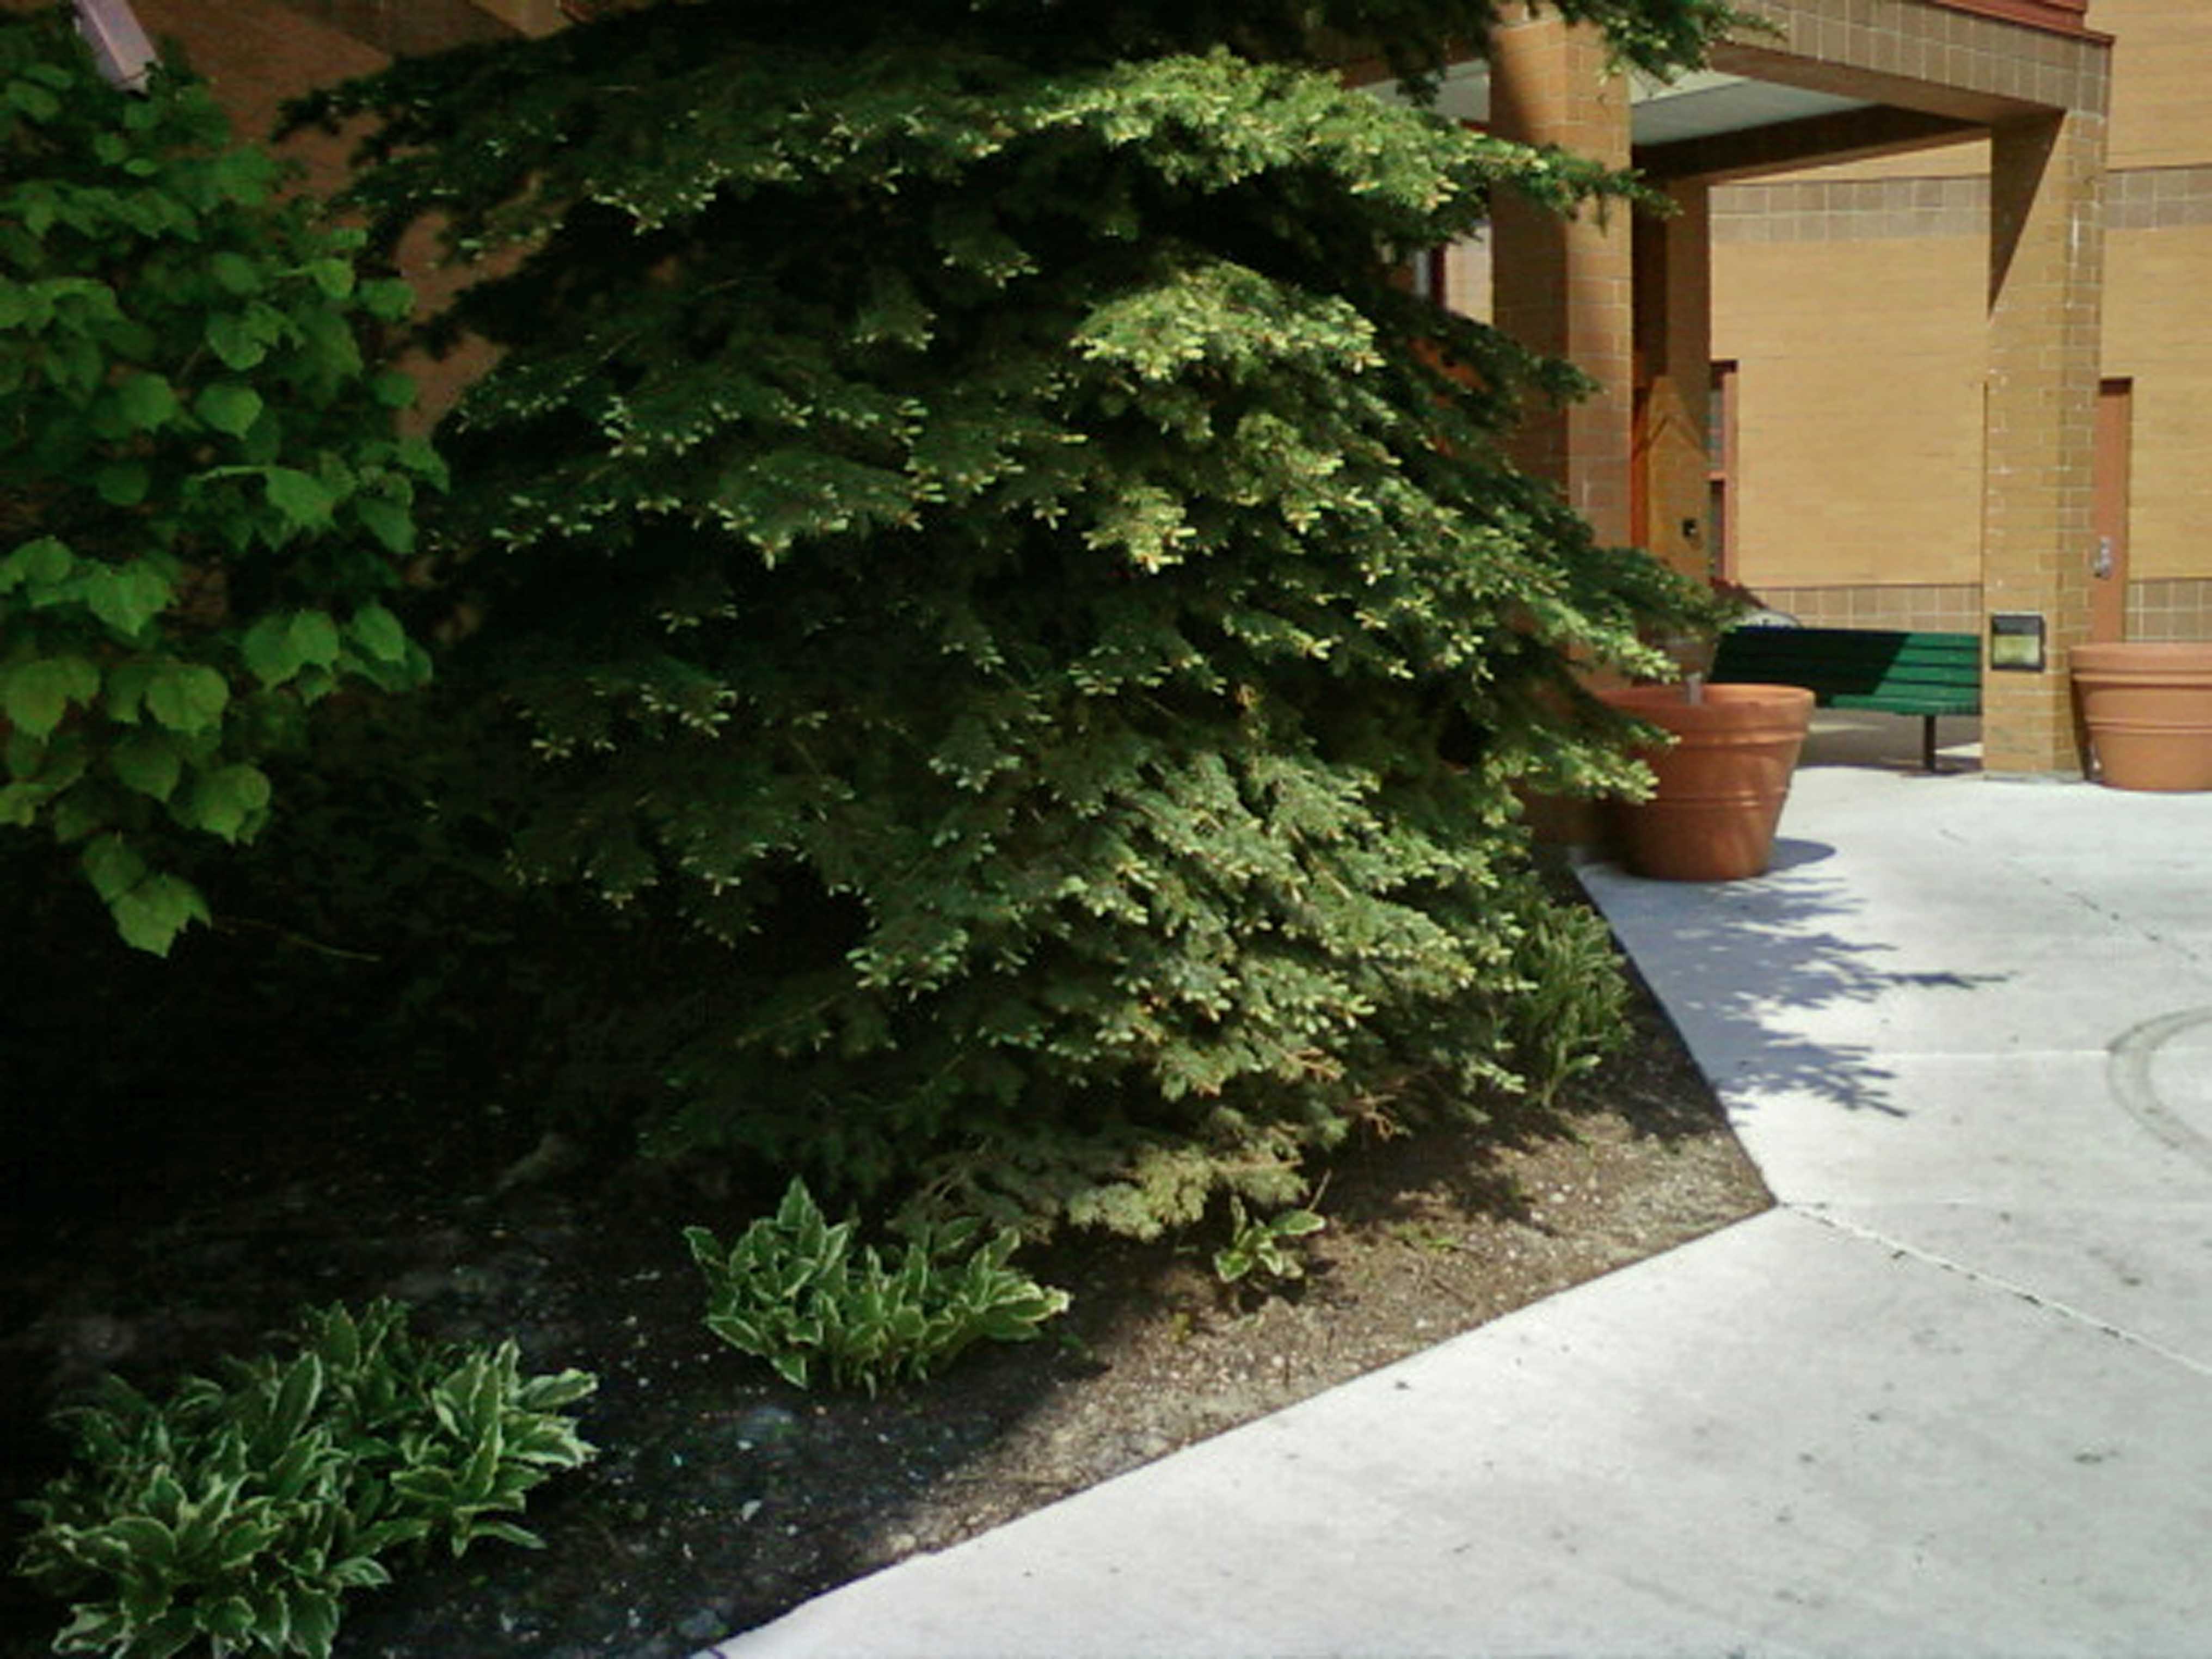
Upon arriving at the site, the first thing I noticed was the overgrown spruce trees planted near the foundation of the building.  All of the shrubs were pruned into submission, rather, I should say sheared into shapes that defied description.

0150

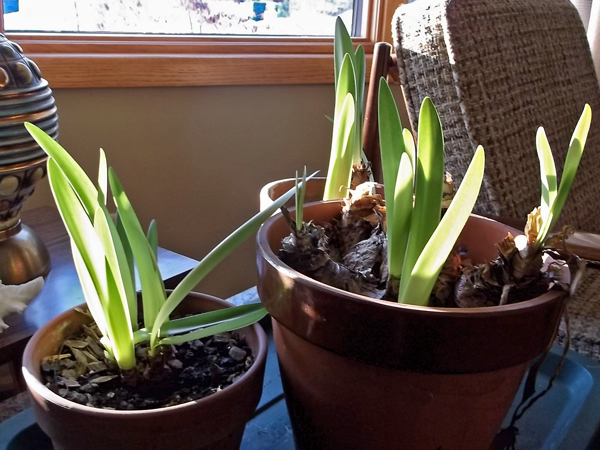
Their will to live is mightier than the power-shear – but just barely.

There was no hope for moving the overgrown spruce trees, they had to be removed.

0140

This spruce tree is trying to grow between a rock and a hard place – “Time to limb it up,” is the typical response to this misplaced planting.

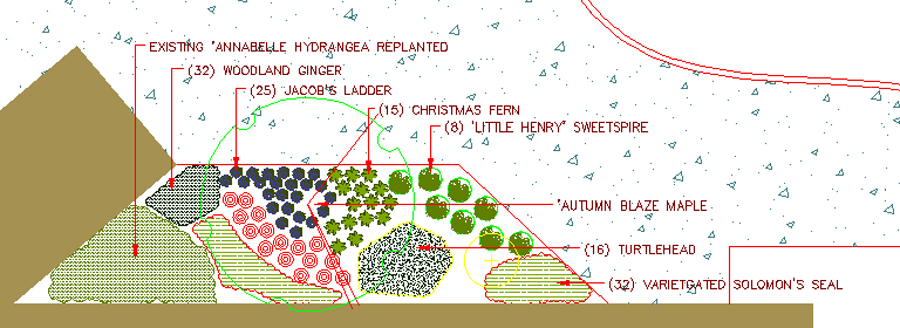
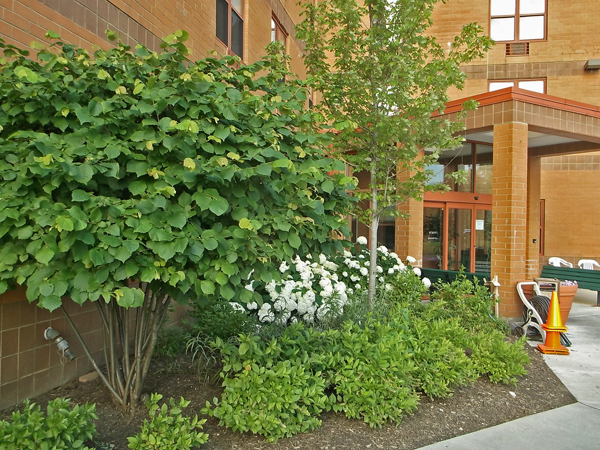
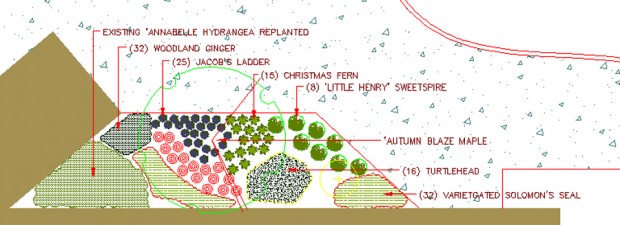
Here, on the north facing wall, the spruce was replaced with a Red Maple hybrid, underplanted with Virginia Sweetspire, Itea virginica, Turtlehead, Chelone glabra, and evergreen Christmas Fern, Polystichum acrostichoides. The white flowered ‘Annabelle’ Hydrangea behind, and the Hazelnut shrub, to the left, were retained.  The pictures that follow where taken in July of 2013, one year after planting.

2226
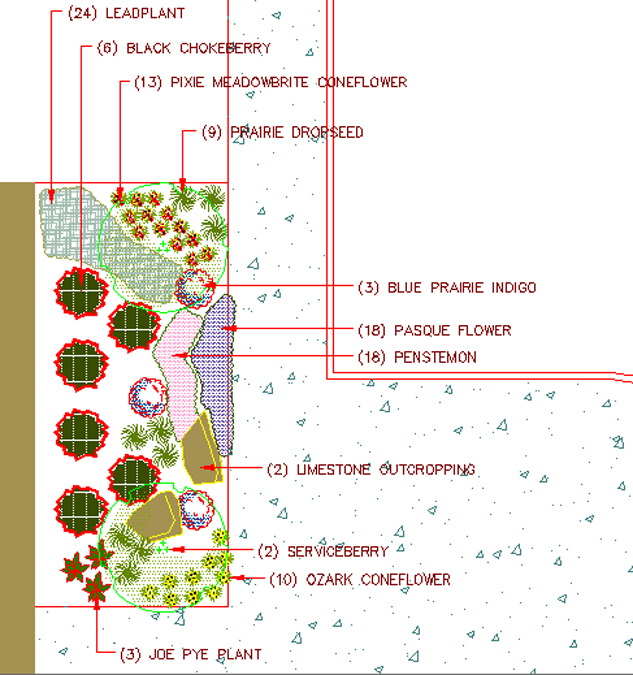
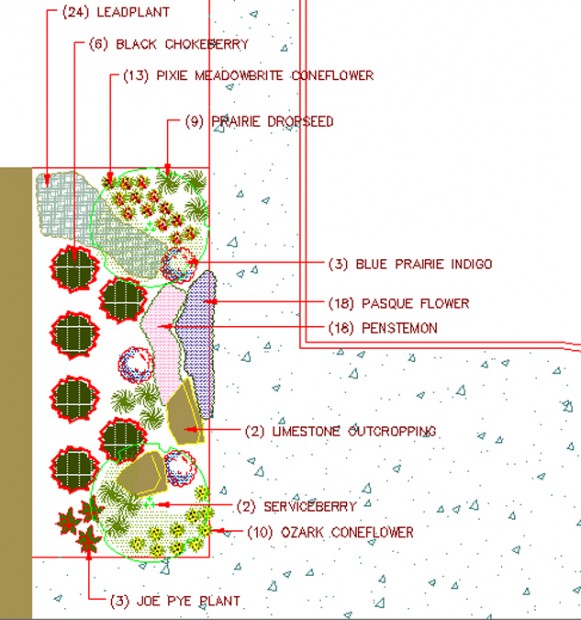
On the east facing wall, native Serviceberry, Amelanchier sp., and Black Chokeberry, Aronia melanocarpa, (both have great fall color, and white flowers in the spring) as well as many Midwestern prairie plants replaced the spruce.  See the planting plan, below, for species names and layout.

DSCF2224

The Blue Baptisia (center right) with its gray-green leaves will form a 4 foot by 4 foot “shrub” when it reaches its mature size in a couple of years. Blue lupine-like flowers show in June, with ornamental seed pods all winter.

2223

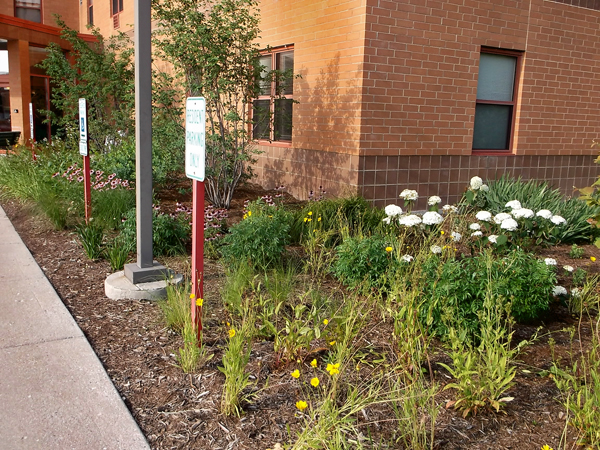
The yellow flowered Sand Coreopsis, C. lanceolata, was installed just a few weeks prior and will show off its mounded habit as it matures. Finches love the seeds that this low-growing flower provides.

In 2013, the wobbly shrubs were removed and more sunny natives were planted, including Nodding Onion, Sand Coreopsis, Purple Coneflower, and Winged Sumac, along with a hydrangea that was moved here from the existing planting at the entry doors.  The rounded shrub, is actually a witch-hazel that will be allowed to grow into its natural picturesque form.

2222

This part of the bed was planted just a month prior to this photo being taken. Nodding Onion in the foreground is just coming into bloom.

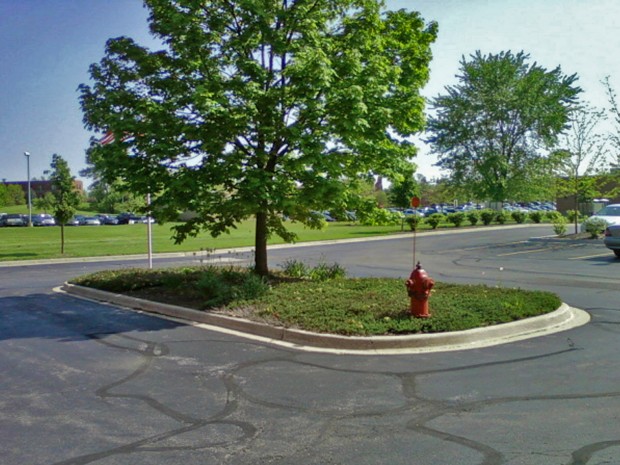
The parking lot island bed was originally planted with a low growing juniper, daylilies, and a Norway Maple – not much to catch the eye, but slightly better than lawn, which is often the default planting, or river rock.

0142

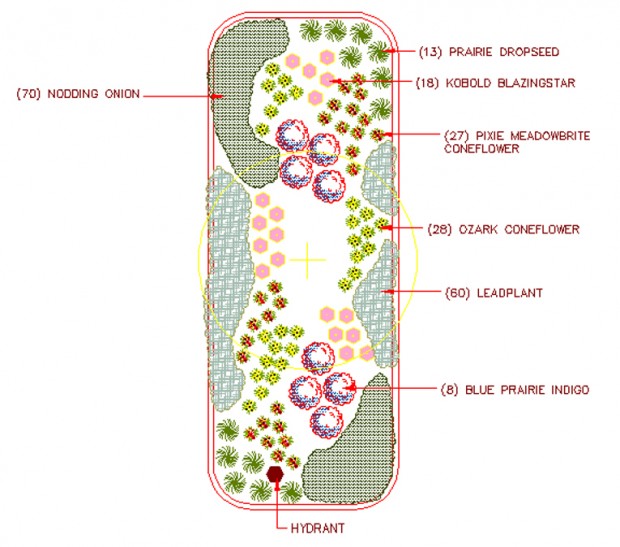
The plants that I chose for the island bed are tough prairie residents that could both take the heat of summer, as well as piles of snow in winter.  Their mature heights are all under 3 feet when in flower.  These pictures show how they are faring after going through their first winter, and in the middle of their second summer.

2230

The plants were also chosen for their ease of maintenance (no deadheading needed, just mow the planting in the early spring, before new growth appears) and were installed in large repeated groupings so that their individual ornamental qualities will be appreciated by even the most staunch traditionalist.

2213

2212

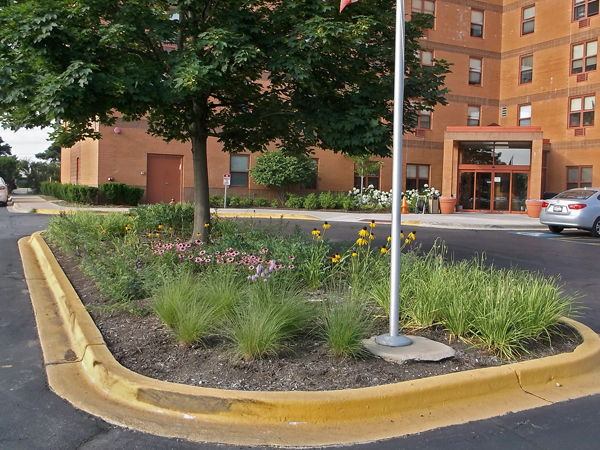
The 18 to 24 inch spacing allows the Prairie Dropseed grass to show off its elegant form as it matures. Soon the soil will not be visible below them

2220

A large grouping of Nodding Onion about to come into flower in late July, with the pods of earlier blooming Blue Baptisia showing behind

This new landscape will get better and better with good maintenance and with time.  The goal of creating an interesting year-round landscape was achieved.  And far from being dull, it is a “welcome relief and contrast” to the monotony of the landscapes that surround too many of our homes and businesses.  It shows that including regionally native plants can make for an ever changing and vivacious landscape, full of life, and full of beauty.

North Facing Bed Planting Plan:

South Foundation Plan ACAD

East Facing Bed Planting Plan

East Foundation Plan ACAD

Island Bed Planting Plan

Island Plan ACAD

Share Button

Comfort Food: Chicken Potpies

9507

Growing up, store bought Banquet chicken potpies were almost always in the freezer, ready for a quick last minute dinner – I loved them, especially in winter, they’re great comfort food.  As with many of my childhood favorites, however, including pizza, egg rolls, and giant soft pretzels, I wanted to try my hand at making a great homemade version of my childhood favorite.

The first thing I learned, is that the definition of “potpie” is a bit slippery.  Most recipes have only a top crust, some traditional versions apparently have no crust – just a thick stew in a, wait for it … pot.   When I visited the Walnut Room at the downtown Chicago Marshall Field’s Department Store a few years back, I of course ordered their famous chicken potpie.  What I remember being served was a ramekin of chicken stew with a croissant set on top of it – not what I was expecting.  Maybe they ran out of pastry crust that day, or decided that puff pastry was ok to use instead of a flakey pastry crust – and where the heck was the bottom crust? – that was missing all together – this was not at all what I was expecting.   Maybe what I wanted was not a true potpie, but simply a better version of what Banquet was calling a potpie – off to the kitchen.

Or rather, to the cookbooks and Google.  Ida Baily’s cook book from 1932 would certainly have a good recipe … or not.  She had versions of meat pies with biscuits on top, meat turnovers – not the historic precedent that I was looking for.  Same for The Joy of Cooking.  Martha Stewart, certainly – well, she came close to what I was looking for, but she also had no bottom crust, and her filling was not what I was trying to achieve with my version.

Ok, so after making chicken and dumplings last year, I thought, “Hey, this could make a great potpie filling.”  And so it did, minus the dumplings.  Now for the crust.

I tried several recipes, some were too buttery – distracting.  An all lard crust was very flaky, but seemed kind of dry – good, but still lacking what I had in mind.  Maybe half butter, and half shortening? BINGO.  To my taste, both vegetable shortening (such as Crisco) and lard worked equally well with butter in the pastry recipe which follows.  I am not sure which is healthier, but, for me the taste is the same.  Ida Baily Allen, in her 1932 Cooking Menus Service cookbook, even mentions that half the total shortening could be cream cheese – hmmm.  I haven’t tried that in this recipe, but have used cream cheese in making pecan tassie dough, and it’s great, so why not?

The pie crust recipe that I went with actually came from the 2006 Marshall Field’s Cookbook (which I bought last year at an estate sale for $3) which included “Mrs. Hering’s Famous Chicken Potpie”.  The recipe is pretty much the same as any other pie crust recipe, except for the fact that it calls for ½ cup butter, and ¼ cup shortening .. and that is a very important and key difference.  I’ve also used Martha Stewart’s “basic pie dough” recipe and it works well if half the butter is substituted with lard or shortening.  Her recipe can be found here.

7123

With Banquet pot pies as the model, I went in search of little four inch round aluminum pie plates.  Off to the dollar store.  While in the Dollar Tree store, I scanned a lot of disposable foil cookware – however, no mini pie plates, sadly.  Just as well though, since they did have ceramic ramekins for a dollar each. BINGO.  I bought nine.  At 4 ½ inches across and holding 8oz (one cup), they were perfect.

Day One

Admittedly, making homemade potpies is not as easy as opening the freezer, pulling out a pie, and baking – but that is why, when I do make them, I make a lot, and freeze most for future dinners.  What follows is the nuts and bolts of making my unique (as it turns out) version of chicken potpies.

Crust Recipe

  • 1 ½ cups all purpose flour
  • 1 ½ teaspoon salt
  • ½ cup of cubed butter, chilled
  • ¼ cup chilled shortening, lard, or cream cheese
  • 3 to 4 tablespoons of ice water

Add first four ingredients to the bowl of a food processor, pulse until mix is crumbly, add water slowly, one tablespoon at a time, pulsing three or four times after each addition.  The resulting mix will be a bit dry, as shown below:

6965

On a clean work surface, press the dough into a flattened round, and wrap in plastic wrap.  Refrigerate for at least one hour, or overnight.  One dough recipe makes three potpies using the ramekins described above.  I made 15 potpies last time so I needed 5 rounds of dough.

6966

Chicken Filling

For the filling of the potpies, I simply make a thickened chicken soup with lots of shredded chicken meat (dark or white meat) and the addition of a cup or so of frozen peas.

To make the stock you will need:

  • 1 large onion cut in half
  • 4 large carrots coarsely chopped
  • 4 stalks of celery coarsely chopped
  • 4 chicken thighs, with the addition of neck bones, back bones, and wing tips if you have them.
  • 1 tablespoon of whole black peppercorns
  • 8 cups of water
  • 4 chicken bouillon cubes or 2 tablespoons of chicken base
  • 3 bay leaves

Add all of the above ingredients to a large stock pot and simmer over low heat for three hours.  Remove the thigh meat (or breast meat) after one hour of cooking.  Keep the backbones, etc. in the stock for the full three hours.  After three hours, strain the stock, discarding the bones and vegetables. Cool the stock overnight in the refrigerator.  Remove any solidified fat the next day.

Day Two

Bring the strained stock to a simmer and add:

  • 5 peeled and diced carrots
  • 5 chopped stalks of celery
  • ½ cup fresh parsley
  • Shredded chicken meat from cooked thighs or breasts
  • 1 cup of fresh or frozen peas
  • Add salt and pepper to taste

Once the above ingredients have come to a simmer, you will need to make a roux to thicken the stock.  To do this, combine in a small pan:

  • 1 stick of butter (=½ cup)
  • 1 cup all-purpose flour

Stir mixture over medium high heat for 3 or 4 minutes until bubbling, add the roux to the stock and stir until stock is visibly thickened.   Depending on the amount of stock, you may need to slowly add the addition of a mixture of ½ cup of flour in 1 cup of cold water.  You may, or may not need the whole amount of flour/water mixture to bring the stock to the proper thickness. Set filling aside to cool slightly, or chill overnight.

6959

While the filling is cooling off a bit, roll out the chilled pastry dough to approximately 1/8 inch thick.  I just keep rolling out the dough until I can cut out three rounds using a pot lid which cuts out perfect 7 inch disks – the right size to make the bottom crusts in my 4½ inch ramekins. Cut up the remaining scraps for the top crust.  I sometimes cut out shapes with cookie cutters for added decoration.

6955

If you plan on freezing some of your potpies for later, line your ramekins with foil before laying in the bottom crust, allow enough foil to fold over the top of the pies when completed.  Remove each foil wrapped pie from the ramekin, place into individual freezer bags and freeze for later use.

6960

6961

To save time, use a ½ cup ladle to fill the dough lined ramekins with the thick filling.

9505

6963

Then top the pies with the scraps of dough left after cutting out the bottom crust rounds.

6964

I partially freeze the foil wrapped potpies while still in the ramekins for one hour before removing them from the ramekins and placing the wrapped pies in individual freezer bags – this step helps them keep their shape while handling them without the support of the ceramic ramekins.

Of course, the pies that you are going to bake right away don’t need to have a foil liner, they can be baked at 375° F for 20 to 25 minutes or until golden and bubbly.  To bake the frozen pies, you can remove the foil and place the frozen pie in a ramekin to bake, or simply open up the foil, to reveal the top of the potpie and bake on a cookie sheet.  Either way, a cookie sheet under the potpies will collect any drips and make for easier clean up.

9506

The filling for these pot pies can be just about anything that you think might be good, including adding seafood, substituting beef stew for the chicken version, or going completely vegetarian and using what is available from your garden.  I may try a cream of asparagus version of this recipe this spring. Good luck, and I hope that you enjoy my version of chicken potpie as much as I do.

6969


Share Button