Early May Blooms, Mixing Natives with Other Plants in the Shady Perennial Garden

9259In early spring many of the Midwestern woodland wildflowers bloom before the trees (mostly oaks) fully leaf out and create a shady canopy.  There are also a few garden perennials from other parts of the world that bring color in to the early May garden.  Let’s take a look a few that are at their peak of bloom right now. 

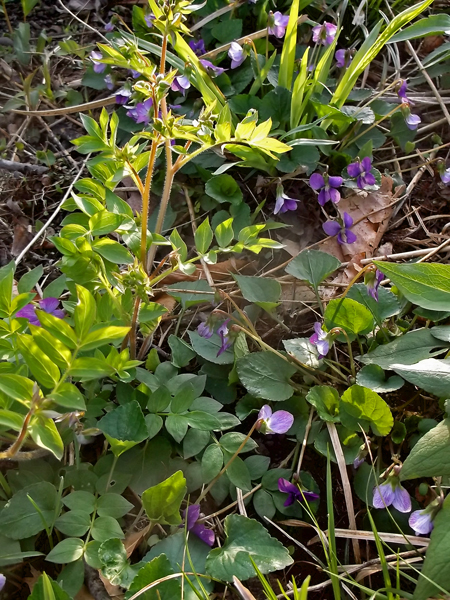
In the picture above, common violets intermingle with Jacob’s Ladder (Polemonium reptans).  Violets come in many shade of blue and purple, as well as yellow and bicolor blue and white.  The violets above were propagated from a naturally occurring population that had reddish purple coloration (difficult to capture in an image) that complements many other early bloomers, including Ruby Epimedium (Epimedium x rubrum), seen below.

9260

9205

9254

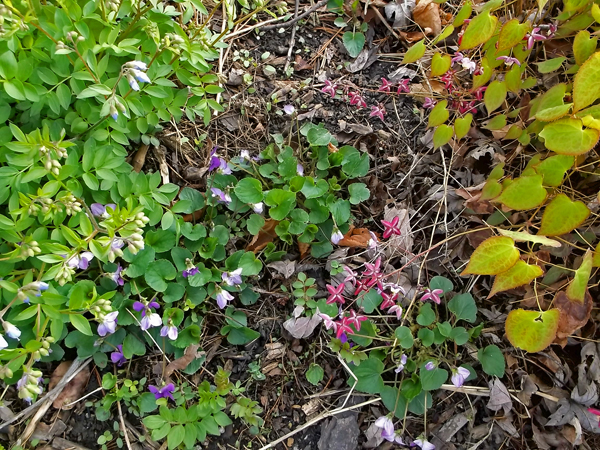
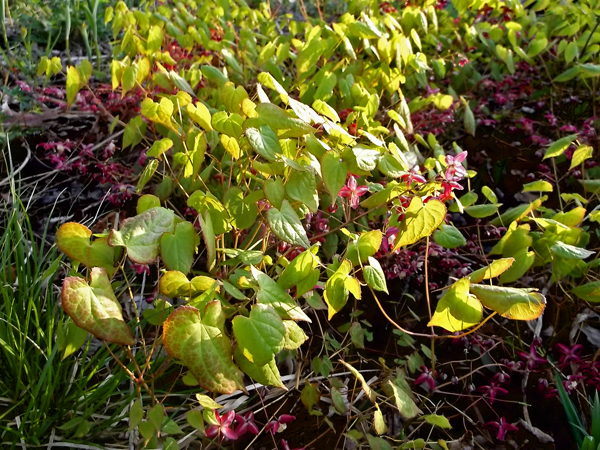
The leaves emerge a bright chartreuse green on the Ruby Epimedium – planted where the morning sun highlights this stunning color.  The leaves turn a more standard green as they mature.  Epimedium sulfureum, a similar species, flowers  in yellow but does not seem to be as robust.  At a foot or so tall and wide, epimedium works well in part shade in groupings of five to nine (or more)  interplanted with other perennials. 

Trilliums, such at the White Trillium (T. grandiflorum) seen below, are often collected from the wild and sold in garden centers, there are, however, some ethical nurseries that propagate their plants from seed or divisions – easy to do, and should be purchased from those sources.  Timing is critical when collecting the seed, generally eight weeks past flowering, since the pods will eventually shatter and the seeds will drop to the ground – as long as the seeds are turning brown, they can be collected and planted in seed flats to expand a population of plants.

9240

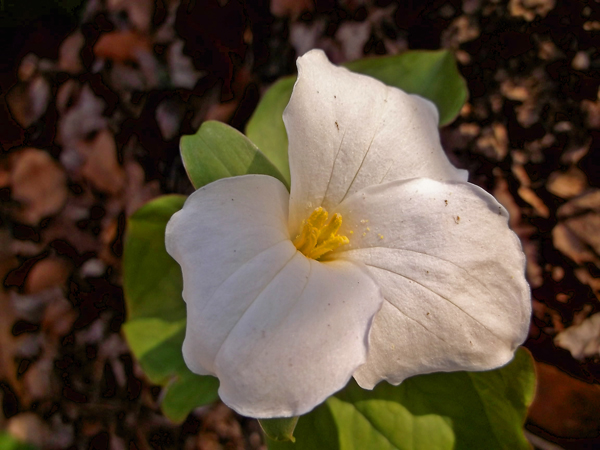
White Trillium, aka. Large Flowered Trillium – a easy to grow shade plant

9242

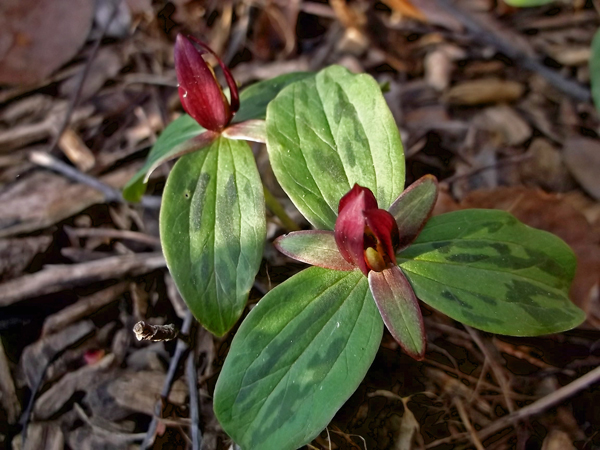
Toad Trillium, T. sessile can have dark purple/black leaves as they emerge in the spring.

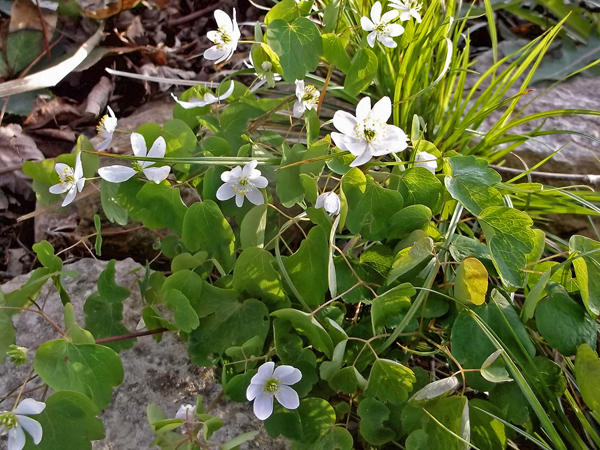
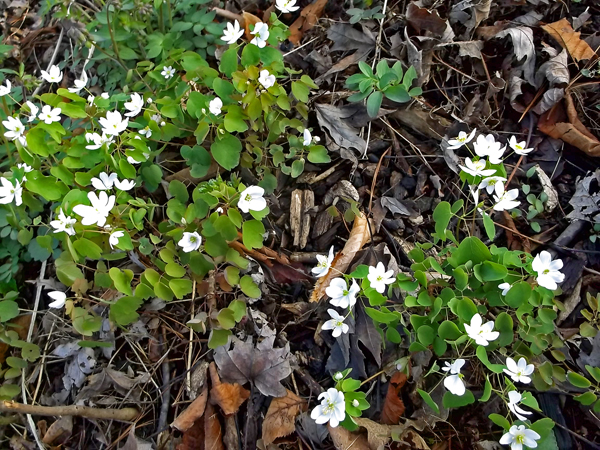
Trillium plants will fade after flowering and go dormant until reemerging the following spring, therefore it is best to plant them where the soil will not be disturbed – such as near the base of trees or large rocks.  Other native woodland plants such as Hepatica, seen below, actually send out their new leaves for the season right after flowering, and look great all summer, and stay green through the winter season, only fading the following spring.  Flowers, which range in color from pink, to white, to purpley blue, sometimes emerge as snow is still on the ground in late April.

9212

Hepatica acutiloba now known as Anemone acutiloba, showing seed clusters

Rue Anemone, like hepatica, is a member of the short flowing buttercup family.  The flowers are pure white to slightly pink, with blue green leaves that remain throughout the summer if the soil does not dry out for an extended period.  Rue Anemone looks great tucked into nooks and crannies throughout the shade garden.  Leaves turn yellow in the fall months.

9246

9202

Rue Anemone, Anemone thalictroides aka, Thalictrum thalictroides.

Lenten Rose (Helleborus sp.) is native to Europe and blooms along with the native woodland flowers.  The large, coarse flowers can be an interesting complement to the other finer textured flowers in the shade garden.  These easy to grow perennials can be divided after flowering, by cutting apart divisions with a bread knife, to create more plants.

9199

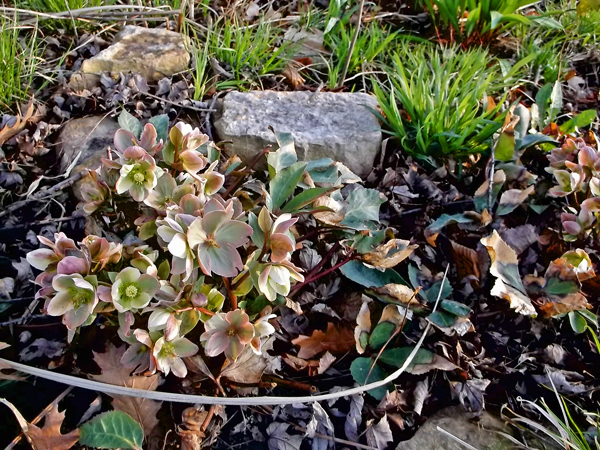
The flowers of Lenten Rose, ‘Ivory Queen’ last for several weeks

The low groundcover Sweet Woodruff (Galium odoratum) is widely found growing in moist woods throughout Europe and Asia, it also mixes well with our Midwestern natives as seen below with Woodland Ginger (Asarum canadense). The leaves of both the Woodland Ginger and the Sweetwoodruff wil stay green all summer if the soil is kept moist during dry spells.

9415

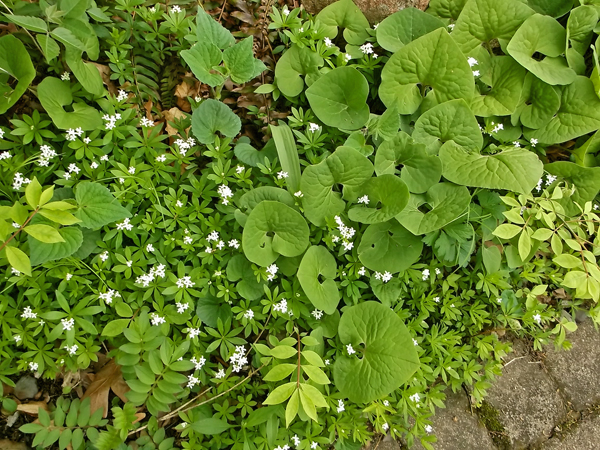
Wood Shield Fern (Dryopteris marginalis) and Christmas Fern (Polystichum achrosticoides) are two easy to grow evergreen ferns native to the Midwestern woods.  Wood Shield Fern’s, upright vase shaped growth, can reach two feet tall, while the Christmas Fern is more low spreading.  Below both are seen mixing well with Woodland Ginger (Asarum canadense), Wild Ramp (Allium tricoccum), and Woodland Geranium (Geranium maculatum) with its pink flowers just coming into bloom in Mid-May.

9413

Christmas fern at lower left and Wood Shield Fern at upper right

Jacob’s Ladder (Polemonium reptans) is a neat low mounded woodland plant covered in sky blue flowers for a week, or so, in May.  The rest of the summer, the pinnate foliage looks great and work well, planted along the edge of the shade garden as a nice transition to lawn or other pathway materials.  The Jacob’s ladder often found in garden centers is a taller European variety, with variegated foliage – inferior in appearance to our Midwestern plants.

9490

Polemonium reptans halfway through its bloom cycle

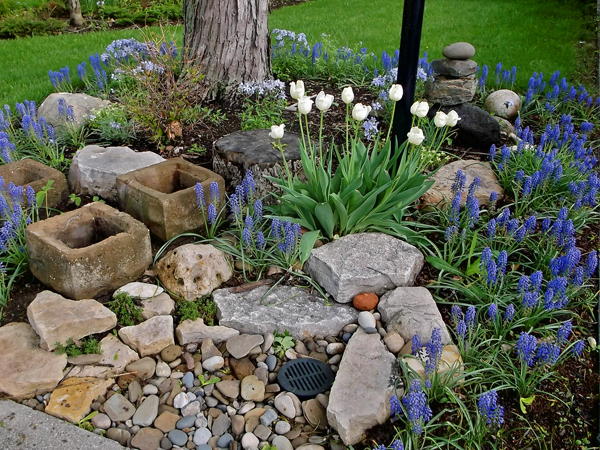
 Blue Wood Phlox can be found blooming at the same time as Jacob’s Ladder, and slightly after Jacob’s Ladder is finished blooming.  In May wiry flower stems shoot up a foot above the low evergreen foliage and put on a bright blue display that works well with other more sun tolerant Dutch bulbs such as Grape Hyacinth (Muscari sp.) and Tulips.  9453
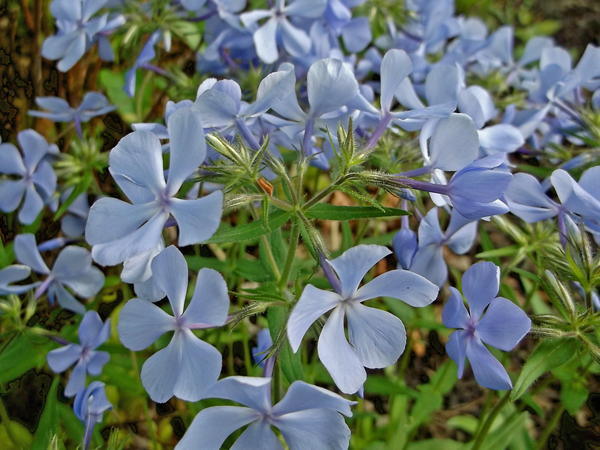
A mix of blues and whites in a rock garden I constructed at my home, gets plenty of sun in the spring, but is somewhat shaded by the overhanging Silver Maple in the summer:

9455

9462
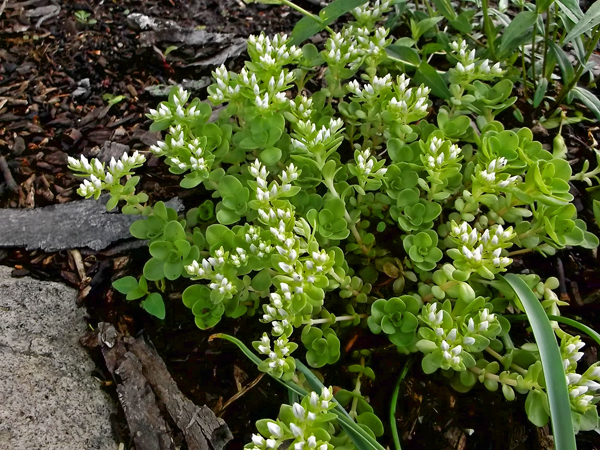
In one part of the rock garden, the shade tolerant Sedum ternatum, native to Midwestern woods and limestone bluffs is just starting to put out its white, star shaped flowers.  The sedum stays evergreen the year around and works well as a groundcover in the shade garden.

9458

Illinois Stonecrop, can be found on limestone bluffs as well as floodplains (Swink & Wilhelm)

Most sedums, this one included, can be propagated by pinching off a short stem and pushing the base of the stem into the ground where more plants are desired.  Occasional watering of the cuttings will promote quicker rooting.

9460

Sedum ternatum with Blue Wood Phlox in the shade garden

Virginia Bluebells (Mertensia virginica) is such a ubiquitous old fashioned perennial, that many gardeners are unaware that it also is a American woodland native – mostly found in flood plains, but very adaptable to well drained garden soils.  The charming bell-shaped blue flowers only last a week, then the plants begin to wane, turn yellow, and go dormant for the summer, it is therefore a good idea to note where these plants occur, so that the plants are not inadvertently disturbed while gardening in the summer months.  Interplanting Virginia Bluebells with others perennials that will help mask the fading foliage is something to consider as well.9438
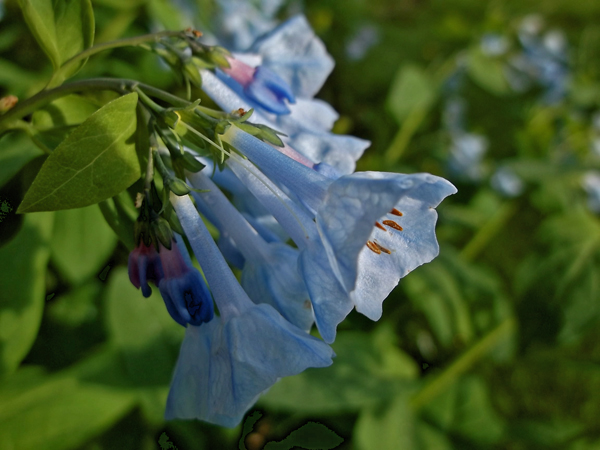
Virginia Bluebells can form large colonies by dropping its seeds in bare soil surrounding the mother plant, these volunteers are easily removed if desired.  The roots are fleshy and can be divided after the plants are finished blooming to create more plants.  Virginia Bluebells will do well in most decent garden soils.

9434

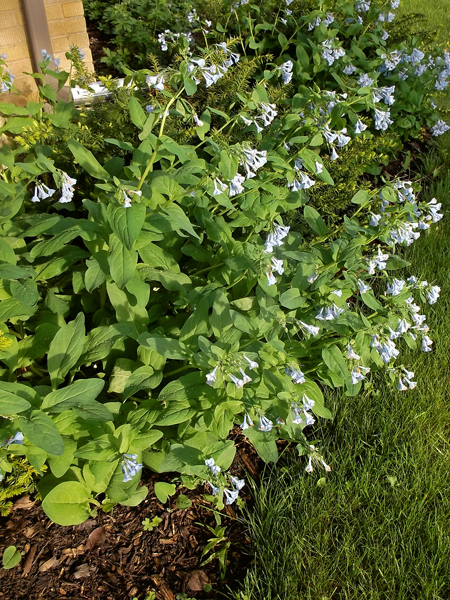
A mass of Virginia Bluebells overtake the low evergreens when in bloom, only to quickly retreat with equal vigor

Another early blooming European native is the old fashioned Money Plant (Lunaria annua.)  Grown for the silver dollar sized papery seed pods (silicles) that are used in dried arrangements.  This plant will reseed around the mother plant, and in some soil types this may be a nuisance.  In my experience, the mother plants have survived many winters (unlike what the name implies) to rebloom in the spring and provided more dried arrangement material the following fall.

9428

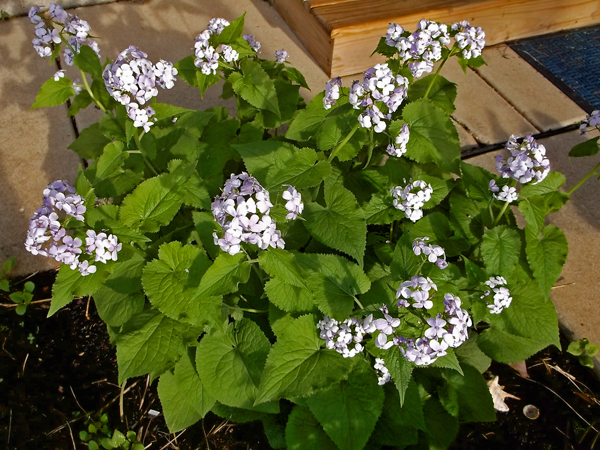
German Money Plant in the back of the herb garden – growing in very dry crumby soil

9424

The four petals indicate that the Money Plant in a member of the cabbage family (Brassicaceae)

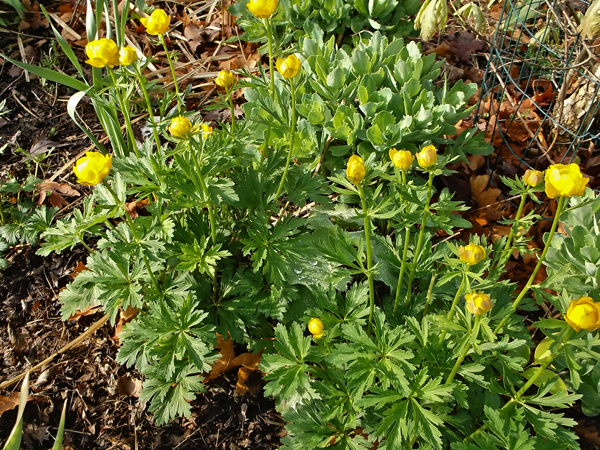
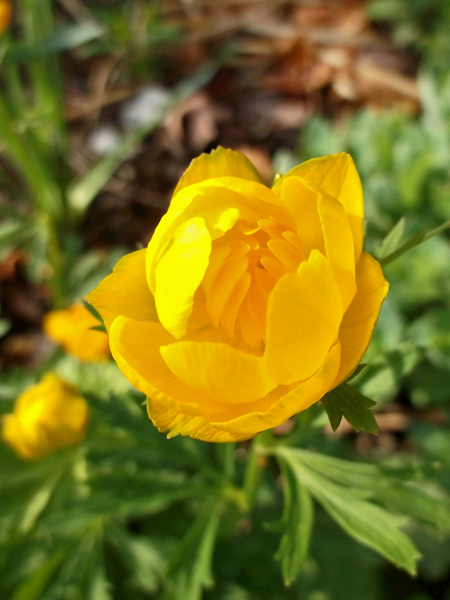
For a punch of bright orange in May, Trollius europaeus, or Globeflower, cannot be beat.  The plant, hailing from Europe,  prefers a bit of shade and consistently moist soil but otherwise is a rather carefree perennial.  It blooms at the same time as some of the Giant Purple Alliums  and Chives and the purplely pinks allium blooms could make for an interesting combination with the bright orange blooms of the Trollius.

9477

9479Lastly, we get back to some Midwestern natives for the shade.  Many sedges do well in dry shade, Penn Sedge (Carex Pensylvanica) being one of them.  This sedge is one of the “sod” formers, as opposed to forming neat tufted “clumps.”  Use this growth habit to your advantage by interplanting such shade plants as the trilliums, noted earlier, violets, whose electric blue flowers play well with the bright green foliage of the Penn Sedge.

9264

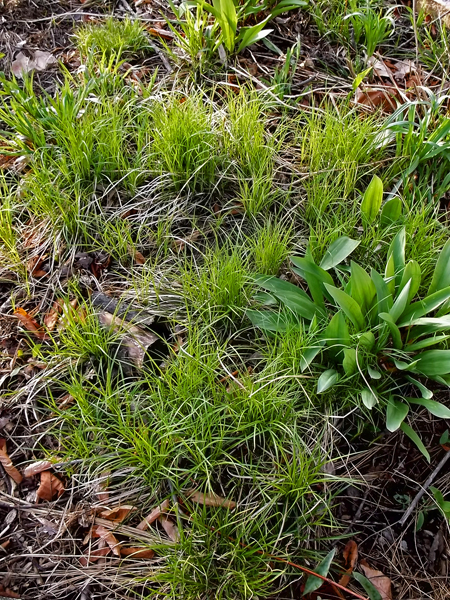
The course foliage of Ramps (middle right) works well with the grasslike foliage of Penn Sedge

The flowers of the Penn Sedge are a bit underwhelming, but the yellow anthers can sometimes be considered a bit showy in mass plantings.

9404

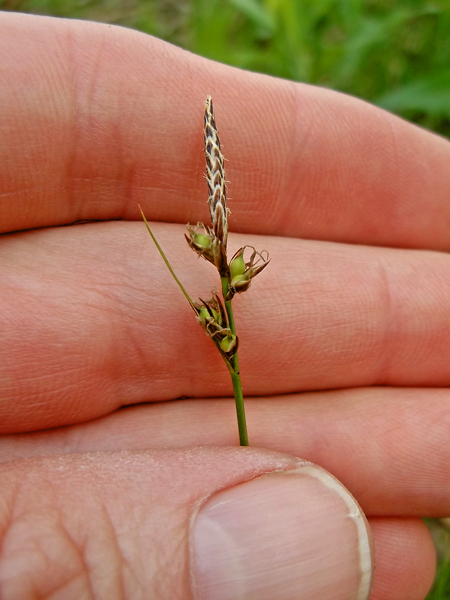
Penn Sedge spikelet – not showing yellow anthers in this photo – few seeds, seen in front of lower finger, are produced and are difficult to collect, as they drop immediately when ripe

All Violets (Viola palmata shown below) look great interplanted with other woodland plants, especially Penn Sedge.
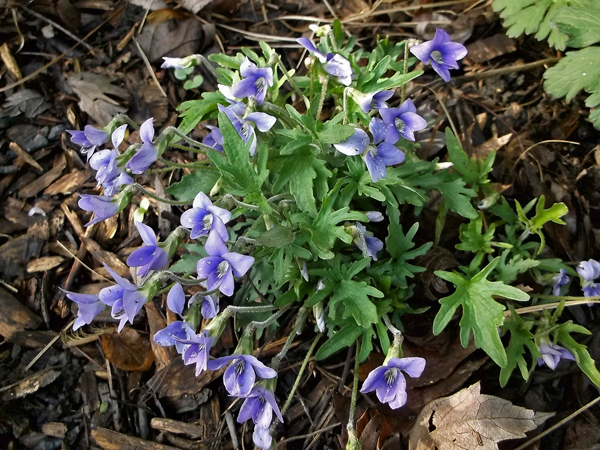
9440

Palm Violet

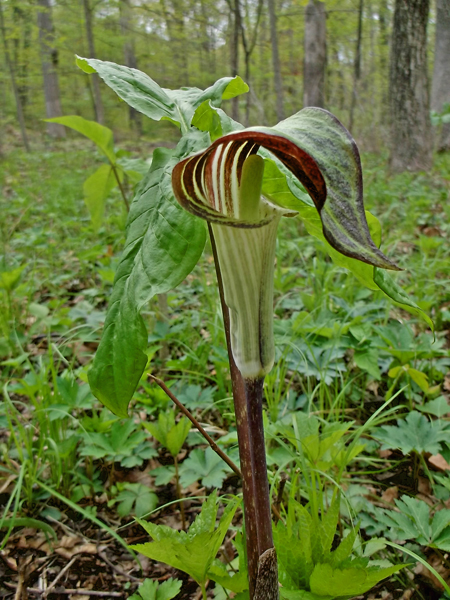
  As do specimen plants such as Jack-in-the-Pulpit (Arisaema triphyllum).  While the plant itself goes dormant after bloom, a showy red seed mass forms to catch the viewers attention in late summer, very cool:

9371 
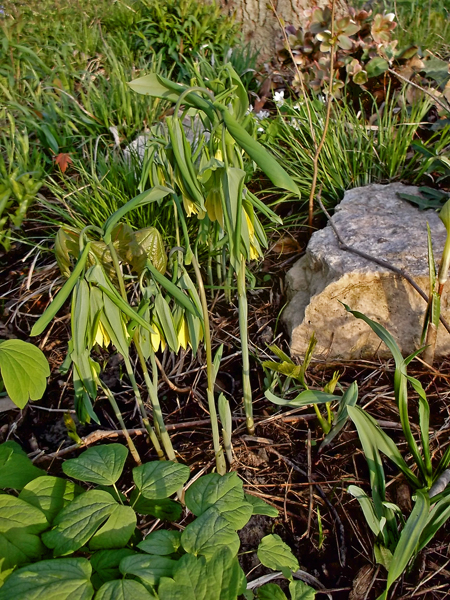
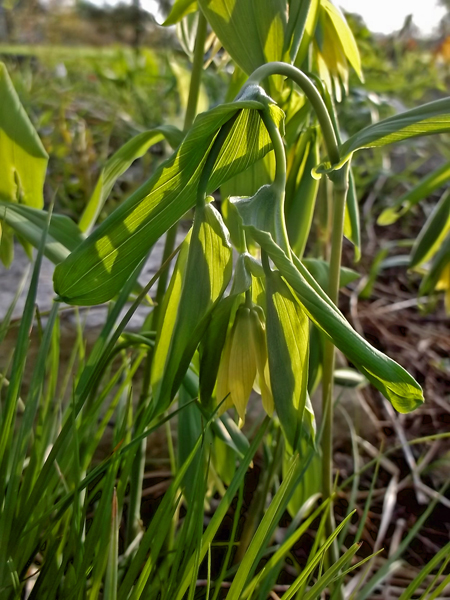
Or Sessile Bellwort (Uvularia sessilfolia) whose foliage looks good througout the summer.  The dainty pendulous yellow flowers are curious, if not overly showy.

9257

9250

 These are just some of the interesting plants that come into flower early and can be combined with each other and with later flowering plants to great effect.

Share Button

Senior Living Goes Native!

2215

‘Pixie Meadowbrite’ Purple Coneflower complements the purple blooms of Leadplant in front, with yellow Paradox Coneflower to the rear of the photo.

Often (always), when I’m in my car, I check out the landscapes surrounding homes, carwashes, hospitals, banks, etc. – mostly it is the standard hedges of Japanese Yew, with some daylillies, a crabapple or two, Pfitzer and Hetz Junipers growing out of their planetary and spiral sheared shapes, even an occasional Yucca to remind us of their tenacity, since no one has used them in a planting design since the 1970’s.  Oh, and big useless swathes of lawn – lots of lawn.  Americans love their lawns.  These plantings mostly reflect our post-war (World War II, that is) fascination with the  formal gardens of Europe – of course, we called them “modern landscapes,” rather than European inspired landscapes, because, heck, we’re Americans, and we don’t copy, we lead.

Palos Park 1957

This Mid-Century house has it all, large lawn, evergreen trees, sheared foundation yews, Pfitzer Junipers, even a row of hosta along the driveway. This was the standard landscape installation for too long.

In 1956, Garrett Eckbo, a landscape architect, and World War II veteran, wrote in his book The Art of Home Landscaping:  

“In the Southwest, where native vegetation tends towards dull grays and browns, the strong dark or clear greens of plants from more humid areas (grown with irrigation) are a welcome relief and contrast, and definitely render the climate more livable.  In grasslands and prairies we plant trees; in forests we clear open spaces and plant grass; in the desert we introduce both trees and grass.  All of these changes have the  function of equalizing, improving, and humanizing these landscapes, making them better places for us to live.” 

In another part of the book Eckbo does encourage lawn only where it is necessary, and to choose trees and shrubs that will not outgrow their location so that their need for pruning is minimized.  If only that happened in the real world.  In the real world, we have three story tall Norway Spruce trees terrorizing all other plant life and blocking the winter sun, lawns in arid Las Vegas, escaped English Ivy taking over our East Coast forests, and Limestone rip-rap surrounding our ponds and walls of metal pilings around our lakes – all in the name of making our surroundings better – more “humanized”.  Great. 

Fortunately, I have noticed changes in the last few years in just how “improving our landscapes” is defined.  In 2000, while working at OWP&P Architects in Chicago, I found myself designing a planting bed for the Skokie, Illinois Public Library, wanting to include the low prairie shrub New Jersey Tea, Ceanothus americana,  I called a large wholesale grower, Midwest Groundcovers, to ask if they had it available; they weren’t familiar with the shrub.  Fast forward, 10 or 12 years, and they not only carry New Jersey Tea, they have an entire section of their catalog dedicated to ornamental Midwestern natives and actively promote their use.  Great! 

In 2011, I was asked to redesign the front landscape of a senior living facility in Des Plains, Illinois.   The client wanted something that looked good the year around, and specifically requested that Midwestern native plants be included in the planting scheme.  All of the new plants, with the exception of Virginia Sweetspire, are Midwestern natives, some, such as the ‘Pixie Meadowbrite’ Purple Coneflower and ‘Autumn Blaze’ Maple are hydrids of native crosses. 

Upon arriving at the site, the first thing I noticed was the overgrown spruce trees planted near the foundation of the building.  All of the shrubs were pruned into submission, rather, I should say sheared into shapes that defied description.

0150

Their will to live is mightier than the power-shear – but just barely.

There was no hope for moving the overgrown spruce trees, they had to be removed.

0140

This spruce tree is trying to grow between a rock and a hard place – “Time to limb it up,” is the typical response to this misplaced planting.

Here, on the north facing wall, the spruce was replaced with a Red Maple hybrid, underplanted with Virginia Sweetspire, Itea virginica, Turtlehead, Chelone glabra, and evergreen Christmas Fern, Polystichum acrostichoides. The white flowered ‘Annabelle’ Hydrangea behind, and the Hazelnut shrub, to the left, were retained.  The pictures that follow where taken in July of 2013, one year after planting.

2226On the east facing wall, native Serviceberry, Amelanchier sp., and Black Chokeberry, Aronia melanocarpa, (both have great fall color, and white flowers in the spring) as well as many Midwestern prairie plants replaced the spruce.  See the planting plan, below, for species names and layout.

DSCF2224

The Blue Baptisia (center right) with its gray-green leaves will form a 4 foot by 4 foot “shrub” when it reaches its mature size in a couple of years. Blue lupine-like flowers show in June, with ornamental seed pods all winter.

2223

The yellow flowered Sand Coreopsis, C. lanceolata, was installed just a few weeks prior and will show off its mounded habit as it matures. Finches love the seeds that this low-growing flower provides.

In 2013, the wobbly shrubs were removed and more sunny natives were planted, including Nodding Onion, Sand Coreopsis, Purple Coneflower, and Winged Sumac, along with a hydrangea that was moved here from the existing planting at the entry doors.  The rounded shrub, is actually a witch-hazel that will be allowed to grow into its natural picturesque form.

2222

This part of the bed was planted just a month prior to this photo being taken. Nodding Onion in the foreground is just coming into bloom.

The parking lot island bed was originally planted with a low growing juniper, daylilies, and a Norway Maple – not much to catch the eye, but slightly better than lawn, which is often the default planting, or river rock.

0142

The plants that I chose for the island bed are tough prairie residents that could both take the heat of summer, as well as piles of snow in winter.  Their mature heights are all under 3 feet when in flower.  These pictures show how they are faring after going through their first winter, and in the middle of their second summer.

2230

The plants were also chosen for their ease of maintenance (no deadheading needed, just mow the planting in the early spring, before new growth appears) and were installed in large repeated groupings so that their individual ornamental qualities will be appreciated by even the most staunch traditionalist.

2213

2212

The 18 to 24 inch spacing allows the Prairie Dropseed grass to show off its elegant form as it matures. Soon the soil will not be visible below them

2220

A large grouping of Nodding Onion about to come into flower in late July, with the pods of earlier blooming Blue Baptisia showing behind

This new landscape will get better and better with good maintenance and with time.  The goal of creating an interesting year-round landscape was achieved.  And far from being dull, it is a “welcome relief and contrast” to the monotony of the landscapes that surround too many of our homes and businesses.  It shows that including regionally native plants can make for an ever changing and vivacious landscape, full of life, and full of beauty.

North Facing Bed Planting Plan:

South Foundation Plan ACAD

East Facing Bed Planting Plan

East Foundation Plan ACAD

Island Bed Planting Plan

Island Plan ACAD

Share Button

Have Plants Ready in Spring by Propagating Now in Fall

6290

Sowing Seeds

October and November are not only the months when we clean up our vegetable gardens and dig up our tender flowering bulbs, such as Canna, Tuberose, and Calla Lillies, but also when  we start planning for next season’s gardens and part of that planning involves planting seeds of perennials that have been collected over the past growing season and stored for fall planting. The photo above, shows the cache of seeds from some of my impromptu (as well as planned) seed collecting this season.  Included in the mix above is Prairie Phlox, Cream Baptisia, Lowbush Blueberry, Swamp White Oak, Hill’s Oak, Common Alumroot, Downy Gentian, and Junegrass.

For the most part, the seeds that I’ve collected are native to my area of the Midwest.  These seeds may have been collected from plants that are already growing in my yard, which were grown from seed collected in years previous.  Other seeds are from native plants that are not currently growing in my gardens, for these, I like to find a local, naturally occurring, seed source.  These sites are not always easy to find, they include railroad right-of-ways along roadsides, others are parcels of land in urban areas that were never developed, some are roadside ditches, others are woodlands.  During the growing season, I am always on the lookout for flowers and grasses that I can come back for later, to collect their seed.  Often, a large showy plant that catches my eye from the car, such as Prairie Dock, will be surrounded by other interesting plants, including Tall Green Milkweed (Asclepias hirtella), Leadplant (Amorpha canescens), or Prairie Phlox (Phlox pillosa) that can only be seen on foot – the locations are written down for later seed collection.  It always pays to check out these sites for uncommon plants, marked by common indicator plants such as Prairie Dock.

6292

Harvested Prairie Phlox seed heads still covered with the nylon stockings.

Some seed, such as Prairie Phlox will shoot its seed far and wide as it ripens.  To be able to collect the seed, I cover the pollinated flowers with nylon stockings tied at the base with string or a twist tie.  Finding a brown stocking in an open field, a month or two later, can be a challenge, I therefore also tie on a piece of plastic marking tape with a bright color, as shown above.  Often a rain will cause the enclosed seed head to lean down, making relocation a bigger challenge than might be expected.

6295I mark a few flowering phlox with pink tape that I haven’t encased in nylons – these, I use as indicators of seed ripeness.  Once I see that these indicator plants have released their seed, I go in a cut the stems of the plants with stockings a put them in a dry place until I am ready to extract the seeds.  The picture above, shows the small black seeds mixed in with the chaff – when planting the seed, I don’t bother removing the chaff – for my purposes, it makes no difference if it remains.
5914

My seed flats are made from 1″ by 4″ lumber, screwed together at the corners, with metal mesh (hardware cloth) stapled to the bottom.  While the picture above shows 1/4″ hardware cloth, 1/2″ openings are preferable when leaving the plants in the flats for more than one season.  Set on wood chip mulch, the larger openings allow plant roots to grow down into the mulch, when the flats are lifted, much of the root system which is down in the mulch will come up with the flat, the 1/2″ opening in the mesh allow the roots to pull through it when the plants are removed from the flats for planting.  Ideally, the plants would be removed from the flats as soon as they have their first true leaves, but sometimes the ideal does not happen, and the plants need to be left in the flats for a longer period.  I’ve left Pale Purple Coneflower (Echinacea pallida) in flats, in this way, for over a year – the mature plants, when pulled from the flats transplanted well, and even flowered that same year – where there were roots that broke off, those broken roots were planted and formed plants as well – bonus plants!

5927The seed flats are planted in fall, because many native plants need to go through cold moist conditions before they will sprout, some such as Pasture Rose (Rosa carolina) need two years before they will sprout, others, such as Little Bluestem Grass (Schizachyrium scoparium) do not need any cold treatment, and will sprout shortly after they are planted if temperatures are warm enough.  Plantsman Bill (William) Cullina explains the particular treatments very well for each species, in his book Growing and Propagating Wildflowers of the United States and Canada, published in 2000. 

Around October, when temperatures are still pleasant, I fill the seed flats with soil.  A loose mix is best.  This allows for good drainage, but also makes it easier to pull the plants out of the flats when it comes time for planting out in to the ground, or pots.  This year I mixed some sandy soil with my native silty soil.  In the past, I have used composted wood chips, and even peat moss to make a light soil to go in to the flats.

5928My homemade sifter with 1/2″ metal mesh was made to fit over my wheelbarrow.  The mesh is sandwiched between the wood frame and 1″ by 2″ wooden cleats.  Drywall screws were used to hold the cleats and the mesh to the wood frame of the sifter. One cleat goes across the center of the mesh to keep it from sagging too much.  I used what I had on hand, but using 1″by 8″ lumber, instead of 2 by 8’s, for the sides would make the box much lighter!

5930Before filling the flats with soil, lay down a few sheets of newspaper, this keeps the loose soil from falling through the mesh.  Once the soil is moistened, this won’t be a problem, and the newspaper breaks down by the following spring – no longer needed.

5932Once the flats are full of soil, lightly tamp the soil to make it level.  I use a tool called a “tile float” made for grouting ceramic floor tiles, but a short piece of 2×4 or even a brick will do the job.

6291Label the flats with the name of each species planted, and the date that they were planted.  I also write down the source of the seed.  Top dress each flat with a bit more sifted soil – no more than a half inch is needed, even less for dust like seeds.  Then tamp the soil again so the seed makes good contact with the soil.

6297Cover your flats with wire mesh to protect the seeds from squirrels, birds, and other curious animals.  I used empty seed flats to protect my seeds, but window screen material, weighted down with stones works fine, as well.  The screening will allow moisture and sun in and keep varmints out. 

With the rare exception, all of the native plants in my yard, including my oak trees, were grown in the way described above.  It’s easy, cost effective, and rewarding.  When spring arrives, you will have plenty of plants waiting for you to set out in the landscape.

6288

Rooting Cuttings

For some of my tender herbs, such as the Pineapple Sage (Salvia elegans) shown above, ornamentals, including showy begonias, and plants such as edible figs, I take cuttings at the end of the season and over winter them indoors. 

The Pineapple Sage, a native of Mexico, is a favorite of mine.  The scent of the leaves is amazing, and the red flowers, late in the season, are the most intense red I have ever seen – they seem to almost glow!  Of course, they can be purchased in spring at many garden centers (I bought my original plant from Ace Hardware), but growing the plant from cuttings in late summer (as late as October), to over winter in your home is so easy, it seems a shame not to.  Take enough cuttings to give, as plants, to gardening friends in the spring. 

To start, cut off a six inch (more or less) length of stem, just below a leaf node, from the mother plant in late summer (now thirty inches tall in your herb garden), remove the leaves from the lower three inches of the cutting and pinch off the tip growth, as shown above.  These can either be stuck right into a mix of 50:50 sand to soil, or perlite to soil or they can be dipped into a jar of rooting powder (rooting hormone, aka. plant growth regulator).  A light dusting is all that is needed.  In July, I took a cutting and stuck it right into some soil in a pot and the Pineapple Sage rooted, at the end of the season, the rooting powder may move things along more quickly.  Make sure to keep the cutting in bright light, but not direct sunlight, until rooting has occurred – about three to four weeks.

6300

6299  6301

6335

For the cutting I took in July, I simply put the pot in a shady spot outside and kept the soil moist, and the plant rooted just fine in less than a month (with no rooting powder).  For the cuttings taken in October, I brought the pot full of cuttings inside and set it in a saucer of water to moisten the soil, the next morning, I removed the pot from the  saucer of water, placed it near a east facing window, and loosely placed a stiff zip-lock bag over the pot of cuttings to help keep the humidity higher around the cutting than the dry ambient air.  The clay (unglazed terra cotta) also absorbs and gives off moisture, thereby aiding in keeping up the humidity inside the bag, unlike a plastic pot.  It is important to let in some fresh air, so do not seal the bag tightly around the pot of cuttings or they will be likely to rot, not root.  Remove the bag every few days to check the soil moisture and to remove any leaves that might have fallen on to the soil – they tend to get moldy if not removed.  Once the cuttings show new growth, in a few weeks, remove the plastic bag and water as needed.


Overwintering Figs and Ornamental Begonias

5471

Ripe figs ready to pick and eat fresh in August!

1111

Edible Fig tree in need of pruning.

5476

Part of the crop, ready to eat, or freeze.

5481As I clean up the garden in early fall, I like to take cuttings of some of my Ornamental Begonias, such as ‘Gryphon’ (shown at right in the photo below)- a newer cultivar that did so well for me this past summer, that I would like to have plants for next summer as well.  Other plants, such as my edible fig, were in need of a pruning – can these cuttings be rooted? No harm in trying!

5069As can be seen in the photo, both the ‘Gryphon’ (yes, that is the correct spelling) and an old fashioned “Hardy Begonia” got quite large this summer, too large, in fact, to bring indoors (sadly).  Taking cuttings is the only option, if I want the plants to continue in my garden next year.  The fig tree overwinters in my garage, it can take below freezing temperatures, into the 20’s, but must be protected if kept outside in the Midwest.  The crop of figs it produces is wonderful, some of the rooted cuttings will be planted in the ground next spring and overwintered in place with protection – stay tuned for that process next fall.

6677The photo above was taken in November, the begonia cutting were made as I pulled the mother plants from their pots a few weeks earlier.  The fig cutting, the “stick” in the photo above, was taken in August, the leaves immediately dried and fell off, leaving only the stem, failure, or so I thought.  Being a mixture of lazy and curious, I left the cutting in the glass of water for two more months, changing out the water once a week.  During that time, I could see the little white buds on the stem below the water, eventually they turned into roots.  Success! (so far)

6678Even though it was mid-November, it happened to be warm enough to work outside, so I brought the plants and a few pots out to my backyard pile of soil (handy to have).  I made sure that that pots had good drainage, then filled the pots with soil – with about a quarter of the soil consisting of perlite to maximize drainage and allow some air to get to the new roots.

6681

‘Gryphon’ Begonia cuttings held in water for a week, no roots yet.

6683

“Hardy Fig” cutting taken two months prior, in August, and kept in a glass of water – nice roots!

The potted cuttings were brought inside and set in front of an east facing window.  No tenting with a plastic bag is needed since the fig already had roots, and the begonias are prone to rot with too much moisture.  Next spring, the fig will be planted in the ground.  Next fall, four foot high metal fencing will be put around the fig, filled with fall leaves and wrapped in plastic until night temperatures rise above 20 degrees in Spring. 

The four begonia cuttings will be separated in the spring and planted in pots large enough to allow the begonias to grow as huge as the mother plant did this past season.  All of these plants will be checked once a week over the winter and watered when the soil is dry to the touch.

6687


Share Button